The Open Broadcaster Software is perhaps one of the most widely known (and used) software suites for streaming.
Whether you’re streaming to Twitch, Youtube, Facebook, other platforms, or if you are recording videos and gameplay to edit and release to youtube – OBS Studio has got you covered.
Being open-source software, it can be used on a wide variety of machine architectures and on most operating systems for consumer PCs and Macs and up.
It supports Microsoft Windows, macOS and a heap of Linux flavours.
In addition to being very adaptable and available, it has great support for 3rd party plugins.
Especially in the audio section.
And the internet is filled with free plugins that you can use in your OBS Studio setup.
The basics
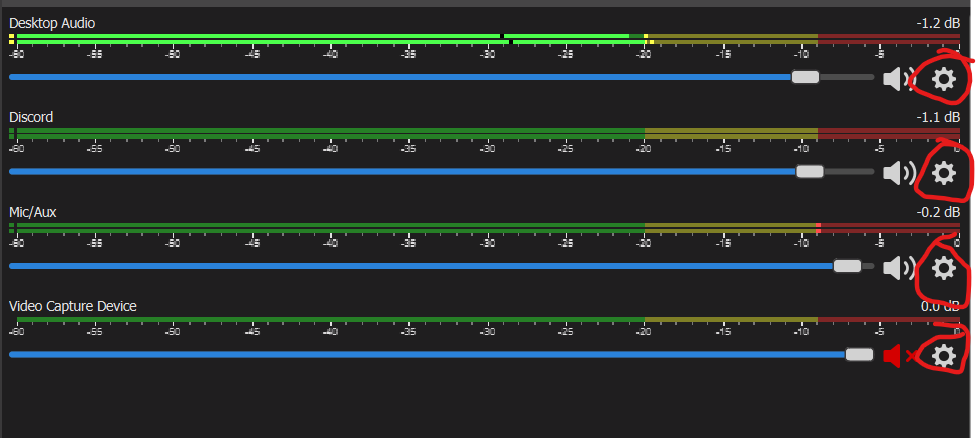
The filters we’ll be looking at can be found in the menu under the cogwheels for Audio Sources in OBS Studio.
Most of this article also applies to Streamlabs OBS, but I don’t have screenshots from that software.
The basic plugins are those that come with OBS Studio. In your OBS Studio, they are referred to as Filters. Filters (or plugins) are programs that alter your sound after it’s been received by your system. But before it is transmitted to the stream or recording.
The ones that are built into OBS Studio (and Streamlabs OBS) are:
- Compressor (with Sidechain Compression/Ducking)
- Expander
- Gain
- Invert Polarity
- Limiter
- Noise Gate
- Noise suppression
- VST Plugin
For my own part, I use mostly the Noise Supression, Compressor and Limiter. In that order.
The order matters. OBS forms a signal chain, with the first filter to be applied is located on top of your list. Meaning, there’s no point at all putting a noise suppression after an effect that increases the overall volume of an audio source.
The noise gate works as a switch, and “turns off” your microphone (or other audio input) when there is no sound louder than the settings allow. This is useful for excluding fan noise or keyboard presses. If a sound is louder than the settings allow, it opens the microphone (or other audio input) for transmitting.
So, for my part – it blocks any room sounds while I am not talking on stream.
The Compressor will try to increase sounds that are silent, and decrease sounds that are loud. This will help even out the perceived audio volume on stream or recording.
The last thing I put in on my sound signal chain is the Limiter. The limiter in OBS Studio is a very simple one – very near a “brick wall limiter”.
It has one job, and it does it splendidly well. You set a maximum output volume on your audio source – and the limiter expertly ensures that no sound is louder than what the limiter is set to.
Very useful if you have guests coming in via Discord or other voice chat software, or if you have a very dynamic voice, or if you are a very loud person.
These 3 Filters is very simple to set up, and they add a whole lot to your production quality in my opinion.
I can share the generic settings for my microphone when streaming.
The settings
The Noise Gate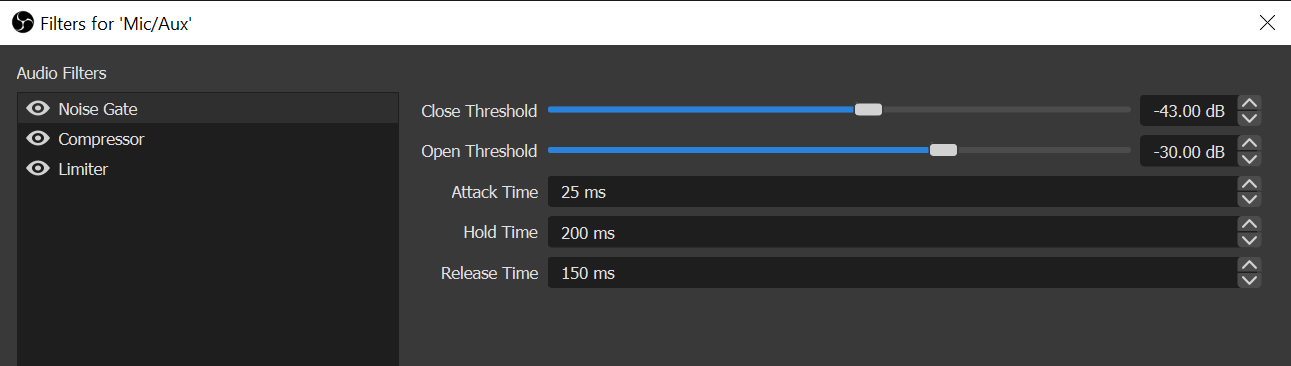
The Close Threshold here is set to -43.00dB. Any sound lower than that is cut entirely from stream or recording. In my previous stream room, there was a fan that made a specific sound. And I found that if I set the Noise Gate to -43.00dB, it cancelled out all sound including the fan sound.
The Open Threshold is set to -30.00dB. This means that the Gate opens for any sound over -30dB.
Attack Time is the time it takes for the Noise Gate to open. This setting is up to you to find out how it works best for you. As a tip, I have found it beneficial to keep it low. As you can see, mine is set as low as 25 MilliSeconds.
Hold Time decides how long the Gate will be held open, waiting for the next sound to come through.
The Release Time decides how long the gate takes to close fully. One thing to note here is that if the Release Time is set too short, the audience can hear clicks and artifacts – and the speech pattern can sound artificial.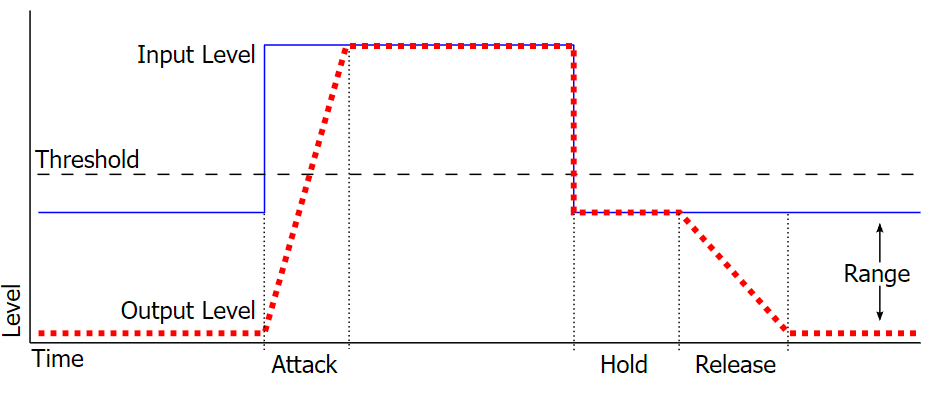
The Compressor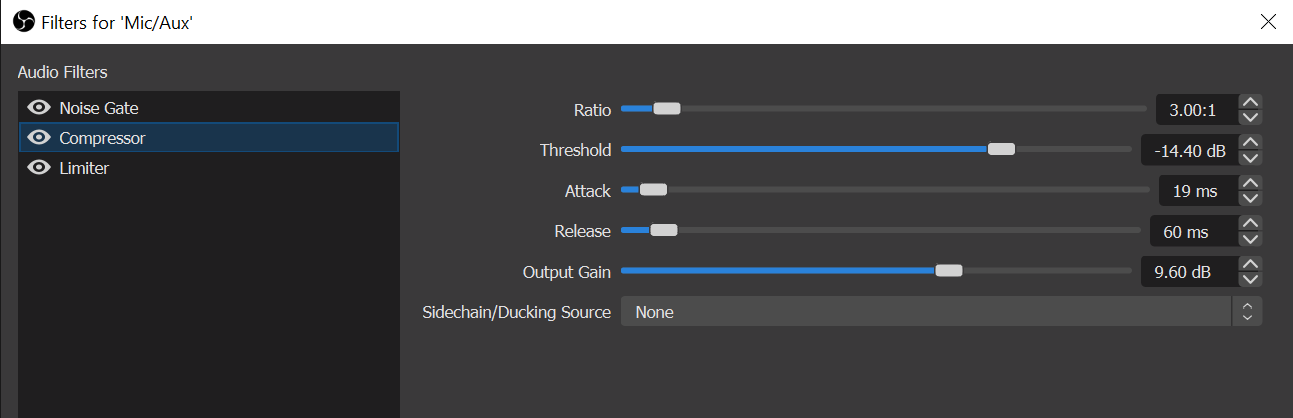
The Ratio is really how much of an effect the compressor should have on the audio input. The higher the ratio, the more compression it receives. In my case, I have found that about 3.00:1 works very well with speech. Also, a good ratio to remember, as it reads 3-2-1 (three to one).
Threshold on the compressor sets where in the audio volume it needs to do work. In my case, it’s not compressing sound that is lower volume than -14.4dB. This setting might be different for your voice, mic and room.
Attack and Release here is the same function as the Noise Gate. It determines how fast (or slow) the compressor should engage. I think it sounds more natural if it has a semi-fast Attack, and a little slower Release.
Sometimes when one uses a compressor, the volume may be perceived as lower than before. That’s where you have the Output Gain to make up for the perceived loss. Use this with care, even if you have the Limiter enabled.
The Limiter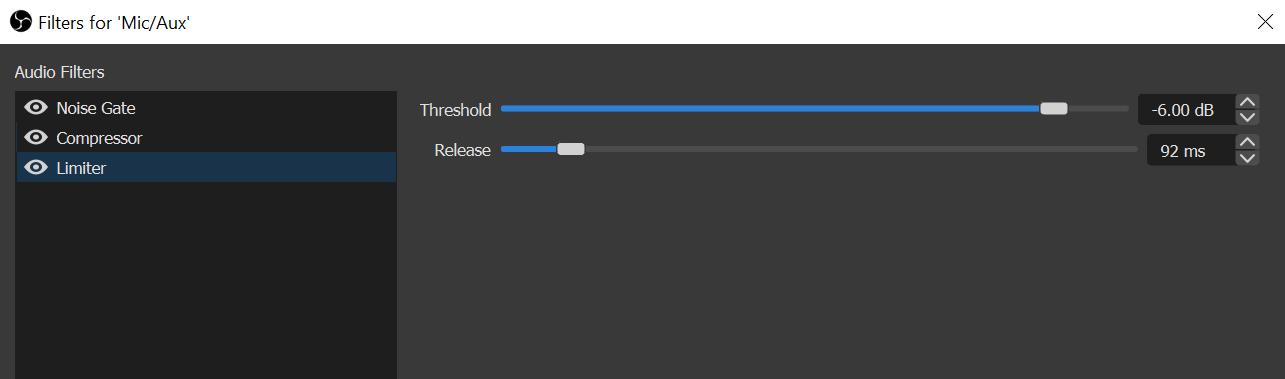
It does exactly what it’s named. It limits the output of the audio source.
In a digital audio world, the loudest audio you can have without distortion (which is really unpleasant on digital) is 0dB. We measure all sound in the processing from the maximum of 0dB and down towards lower volume.
So, to have some headroom – I have set my limiter to -6.00dB. This means that any sound my microphone picks up, can not be transmitted to a stream or recording louder than -6dB. However, my experience says that all Limiters are different – and some are a bit slow.
I’ve yet to test OBS’ Limiter at its fullest, so I set it to a safe level, in case it’s “slow”, and can let sudden sounds through that are louder than the setting.
A clever thing to remember is that all these filters can be used on your secondary audio sources as well. Like the Discord co-hosts or the game audio. You can set those to a Limiter setting of -8dB, which would prevent co-hosts or game audio being louder than you on your recording or stream.
I hope this was helpful for some. If you have insights that we need to have in here, let us know – or put it in the comments.